![[SOLVED] WEB375 LAB 6 CONFIGURE A MYSQL SERVER IN LINUX: The purpose of this lab is to configure MySQL server in Linux. Use the IP addresses that exist when you start Linux.](https://grademerit.com/wp-content/uploads/edd/2024/01/Screenshot-2024-01-23-033053.png)
[SOLVED] WEB375 LAB 6 CONFIGURE A MYSQL SERVER IN LINUX: The purpose of this lab is to configure MySQL server in Linux. Use the IP addresses that exist when you start Linux.
Virtual Machine Login Information for PLABFED01 and PLABFED02
Username: Student
Password: Password
Username: root
Password: Password
Lab Diagram
During your session you will have access to the following lab configuration.
WINCONSOLE PLABFED01 PLABFED02
The Linux servers also connect to a private network. The IP address of PLABFED01 is 192.168.240.11 and the IP address of PLABFED01 is 192.168.240.12.
[SOLVED] WEB375 LAB 6 CONFIGURE A MYSQL SERVER IN LINUX: Connecting to Your Lab
In this module, you will be working on the following equipment to carry out the steps defined in each exercise.
Each exercise will detail which console you are required to work on in order to carry out the steps.
To start, simply click on the named server from the device list (located on the left hand side of the screen) and click the Power on from the Tools bar. In some cases the devices may power on automatically.
During the boot up process, an activity indicator will be displayed in the Name tab:
If the remote console is not displayed automatically in the main window (or popup), click the Connect icon located in the Tools bar to start your session.
If the remote console does not appear, please try the following option:
In the event this does not resolve your connectivity problems, please visit our Help / Support pages for additional resolution options.
[SOLVED] WEB375 LAB 6 CONFIGURE A MYSQL SERVER IN LINUX: TASK A – General Background Information
This Lab shows the basic steps of configuring a MySQL server and creates a simple database.
The steps to do this include:
[SOLVED] WEB375 LAB 6 CONFIGURE A MYSQL SERVER IN LINUX: TASK B – Configure Basic Settings for MySQL Step-By-Step
We start by setting up a basic MySQL server. As always when doing any type of system administration, we need to perform them using root account. Use Putty to logon plabfed01 as root.
Step 1: To stop all firewalls or security features, type the following commands:
#systemctl stop firewalld
#systemctl stop iptables
Step 2: Make sure the MySQL packages are installed. You should be able to discover this with the following command:
If it tells you that mariadb is not installed, to install it type:
#yum –y install mysql mysql-server
Step 2: To start the mysqld service, type:
#systemctl start mysqld
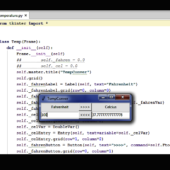
[SOLVED] WEB375 LAB 6 CONFIGURE A MYSQL SERVER IN LINUX: Step 3: To check the mysqld status, type:
#systemctl status mysqld
An active mysqld status looks like this:
Note: You can check for errors using command journalctl –xn. Below is a sample of journalctl –xn command output without any error.
Step 4: MySQL Secure Installation performs the following:
To secure the MYSQL installation, type:
#/usr/bin/mysql_secure_installation
The prompt will ask you for your current root password, so leave it blank by pressing Enter.
The prompt will next ask you if you want to set a root password. Choose “Y” and follow the instructions. Use the root password Password.
Fedora automates the process of setting up MySQL, asking you a series of yes or no questions. Say “yes” to all the options, or press Enter since “yes” is the default selection. At the end, MySQL will reload and implement the new changes.
[SOLVED] WEB375 LAB 6 CONFIGURE A MYSQL SERVER IN LINUX: Step 5: Connect to MySQL database (localhost) with password:
# mysql -u root -p
Note: The -p will make it prompt you for a password.
The root password is Password.
Step 6: To exit MySQL database, type:
[SOLVED] WEB375 LAB 6 CONFIGURE A MYSQL SERVER IN LINUX: TASK C – Create Your First SQL Server Database in Three Quick Steps
Connect to MySQL database (localhost) with password using command mysql -u root -p
Step 1: Create database
To create a new database called Your_First_Name_DB (i.e. MelissaDB), type the following statement and press Enter :
Note: Mine is called MyFirstDB; yours should be named differently.
Note: The statement is ended with the ; (semi colon)
Step 2: To use the new database, type the following command and press Enter:
Step 3: Create new table
To create an Employees table to hold data, type the following command and press Enter:
Step 4: Enter data
To enter data into the Employees table, type the following statements:
Step 5: View data and exit MySQL
Execute the following statements:
[SOLVED] WEB375 LAB 6 CONFIGURE A MYSQL SERVER IN LINUX: TASK D – Lab Report Preparation
Step 1: Be sure in root account. Clear the screen and type the command #systemctl status mysqld to display the mysqld status and capture the Linux desktop. Save this image to your Lab Report document in the space allocated for the #systemctl status mysqld command.
Step 2: Be sure in root account. Clear the screen and use the command #mysql –u root -p file to logon to the mysql database as root and capture the Linux desktop. Save this image to your Lab Report document in the space allocated for the #mysql –u root -p command.
Step 3: Use the statement show databases; to display the list of current databases showing Your_First_Name_DB database, and capture the Linux desktop. Save this image to your Lab Report document in the space allocated for the show databases; statement.
Step 4: Use the statements USE and SELECT to view the table’s content of the Your_First_Name_DB database and capture the Linux desktop. Save this image to your Lab Report document in the space allocated for the SELECT statement.
This concludes the Week 6 Lab.
![[SOLVED] WEB375 LAB 7 CONFIGURE IPTABLES IN LINUX: The purpose of this iLab is to configure an iptables firewall in Linux. Use the IP addresses that exist when you start Linux. Virtual Machine Login Information for PLABFED01 and PLABFED02 Username: Student Password: Password Username: root Password: Password](https://grademerit.com/wp-content/uploads/edd/2024/01/Screenshot-2024-01-23-033903.png)
[SOLVED] WEB375 LAB 7 CONFIGURE IPTABLES IN LINUX: The purpose of this iLab is to configure an iptables firewall in Linux. Use the IP addresses that exist when you start Linux. Virtual Machine Login Information for PLABFED01 and PLABFED02 Username: Student Password: Password Username: root Password: Password
![[SOLVED] WEB375 LAB 5 CONFIGURE HTTP SERVER IN LINUX: The purpose of this Lab is to configure an Apache web server in Linux. Use the IP addresses that exist when you start Linux. Virtual Machine Login Information for PLABFED01 and PLABFED02 Username: Student Password: Password Username: root Password: Password](https://grademerit.com/wp-content/uploads/edd/2024/01/Screenshot-2024-01-23-032122.png)
[SOLVED] WEB375 LAB 5 CONFIGURE HTTP SERVER IN LINUX: The purpose of this Lab is to configure an Apache web server in Linux. Use the IP addresses that exist when you start Linux. Virtual Machine Login Information for PLABFED01 and PLABFED02 Username: Student Password: Password Username: root Password: Password
![[SOLVED] WEB375 LAB 4 CONFIGURE A VSFTP SERVER IN LINUX: The purpose of this Lab is to configure the vsftp server in Linux. Use the IP addresses that exist when you start Linux. Virtual Machine Login Information for PLABFED01 and PLABFED02 Username: Student Password: Password Username: root Password: Password](https://grademerit.com/wp-content/uploads/edd/2024/01/Screenshot-2024-01-23-031333.png)
[SOLVED] WEB375 LAB 4 CONFIGURE A VSFTP SERVER IN LINUX: The purpose of this Lab is to configure the vsftp server in Linux. Use the IP addresses that exist when you start Linux. Virtual Machine Login Information for PLABFED01 and PLABFED02 Username: Student Password: Password Username: root Password: Password